Lottie is a JSON-based file format that allows you to easily display high-quality animations on websites and apps. In this article, I will guide you through the basics of Lottie animations, how to create them, and how to implement them on your website.
Visit the official Lottie website here
Benefits of Using Lottie
Introducing five benefits of using Lottie.
1. Small File Size and High Quality
- Since Lottie animations are stored in JSON format, they are significantly smaller in file size compared to video or GIF files, which helps reduce the load time of your website or app.
- As vector data, Lottie animations remain crisp and clear even when scaled up or down.
2. Cross-Device Compatibility
- Lottie animations can be used across various platforms, including web, mobile, and desktop.
- They are optimized for performance on each platform, ensuring smooth animation playback.
3. Enhanced Collaboration Between Designers and Developers
- Designers can export animations directly as Lottie files, allowing for quick and accurate implementation from design to development.
- This ensures that the design quality is maintained during implementation, faithfully reproducing the designer’s intent.
- If animations need to be modified or updated, developers only need to generate a new JSON file, reducing their workload.
4. Easy Customization
- Lottie animations can be controlled programmatically, allowing for dynamic changes in response to user interactions such as hover or click. They can also be easily paused and resumed.
- Properties such as color, size, speed, and playback direction can be adjusted, making it easy to adapt animations to design changes.
5. SEO-Friendly
- Because Lottie uses text-based JSON files, search engines can easily understand the content. This is particularly beneficial when the text or elements within the animation contain important information.
How to Create Lottie Animations
Currently, Lottie animations can be created on the following platforms. Here, I will introduce methods using Lottie Creator and Adobe After Effects.
- Lottie Creator(Web-based)
- Adobe After Effects(LottieFiles for After Effects plugin)
- Figma(LottieFiles for Figma Plugin)
- Canva(LottieFiles for Canva Plugin)
Using Lottie Creator
Lottie Creator allows you to create animations directly on the Lottie website. It is suitable for those who want to create animations easily without using additional tools.
For more details, please refer to the Comprehensive Guide to Creating Animations with Lottie Creator.
1. Starting a New Project
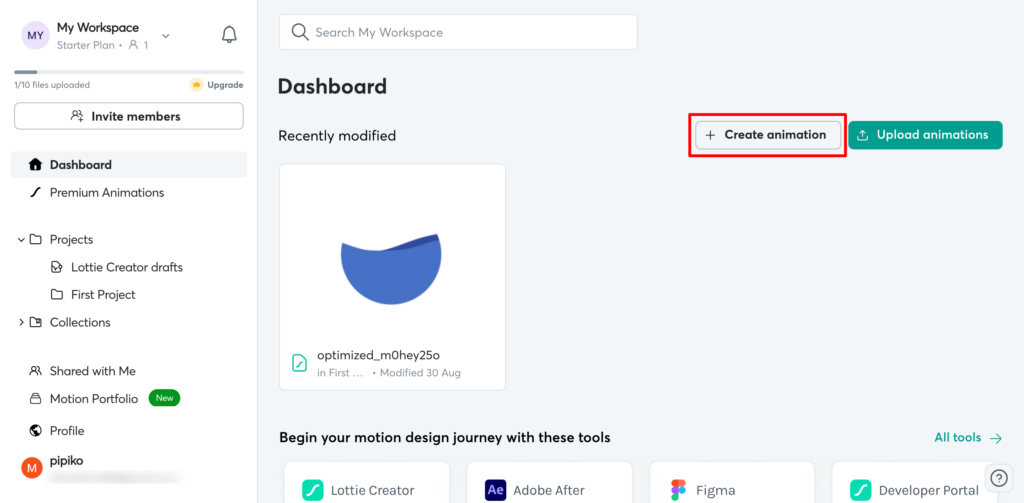
Click the “+ Create animation” button from the dashboard.
2. Adding Basic Shapes and Text
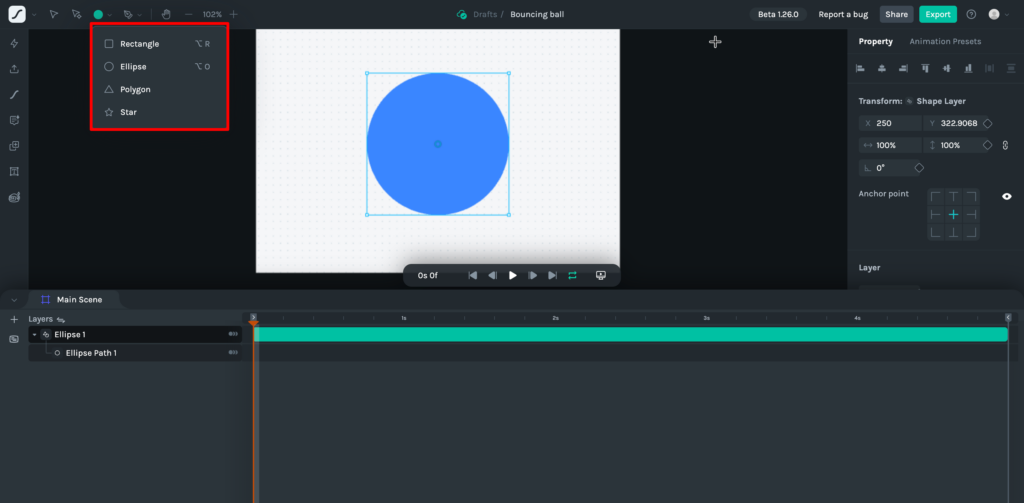
Select shape tools (such as rectangles or circles) from the toolbar at the top of the screen.
Drag and drop elements onto the canvas.
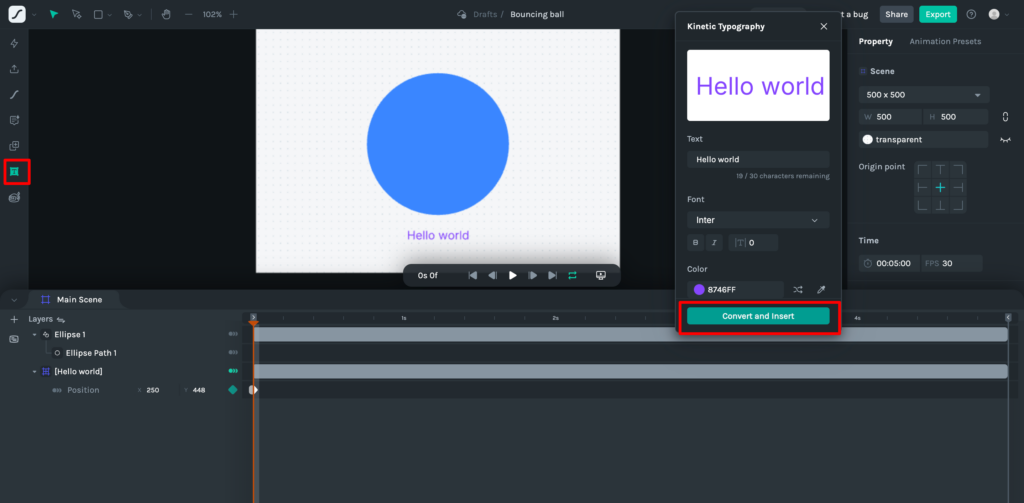
To add text, select “Kinetic Typography” from the side menu.
Adjust the content, color, font, etc., in the right panel, and click “Convert and insert” to apply.
You can also use your preferred animations from the “Discover Animation” section in the side menu.
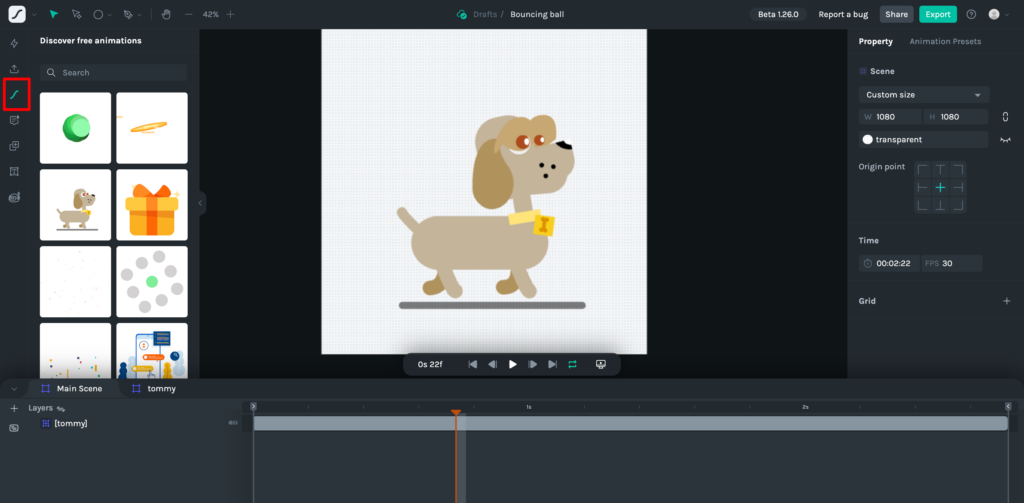
3. Setting Up Animations
Use the timeline panel at the bottom of the screen to add keyframes.
Click the “Animation Toggle” next to the layer and open “Animation Properties” to add the desired animation.
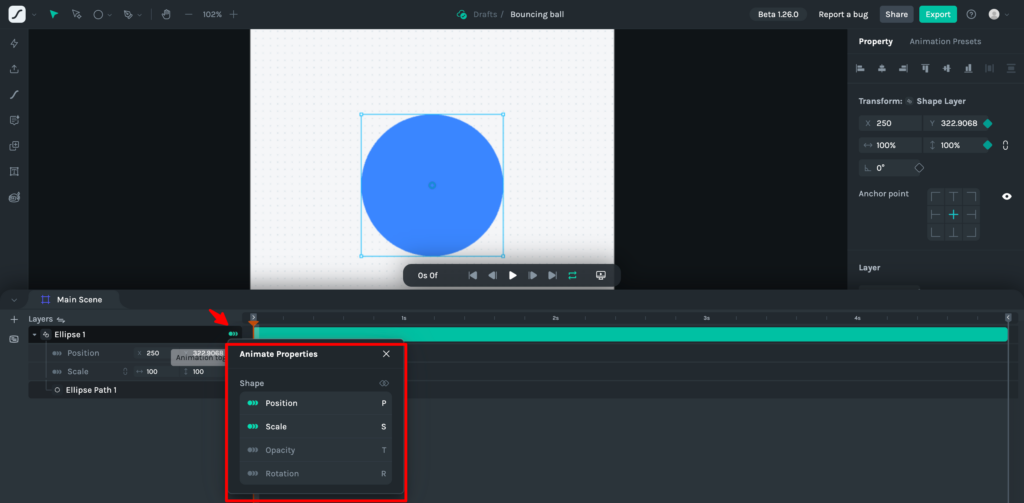
Add keyframes at any position on the timeline and change the position, size, opacity, etc., of the elements.
Adjust the interpolation method between keyframes to smooth the animation.
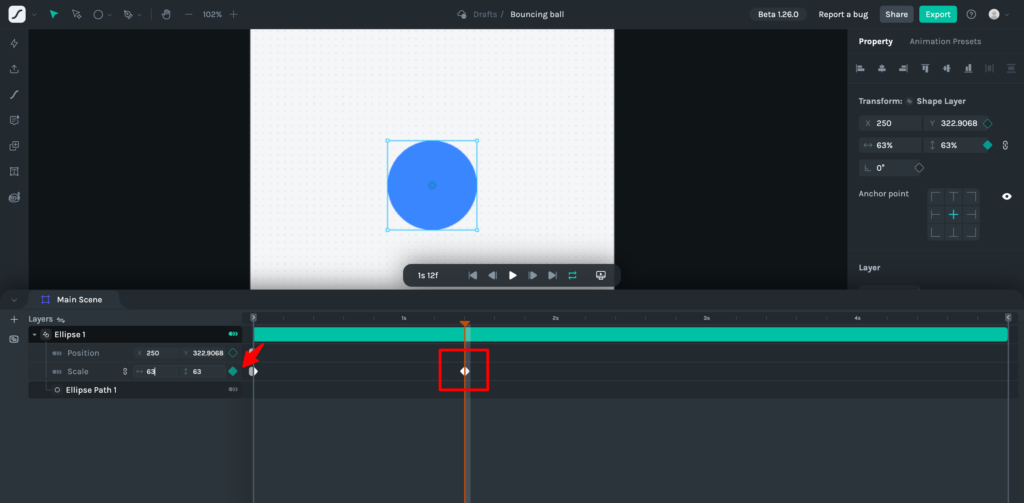
4. Utilizing AI Support (Motion Copilot)
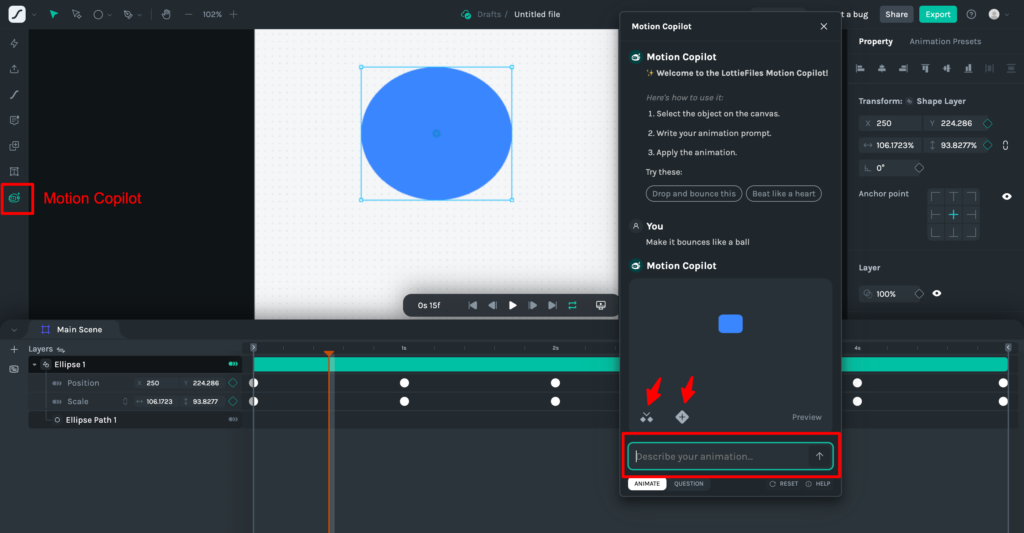
Select “Motion Copilot” from the side menu.
Select the object you want to animate and enter a description of the animation in the “Describe your animation” input field (e.g., “Make it bounce like a ball“).
The AI will generate the animation based on the description, and you can click the icon to apply it. The left icon applies the animation to the object, and the right icon replaces it with the AI-generated animation.
5. Preview and Adjustments
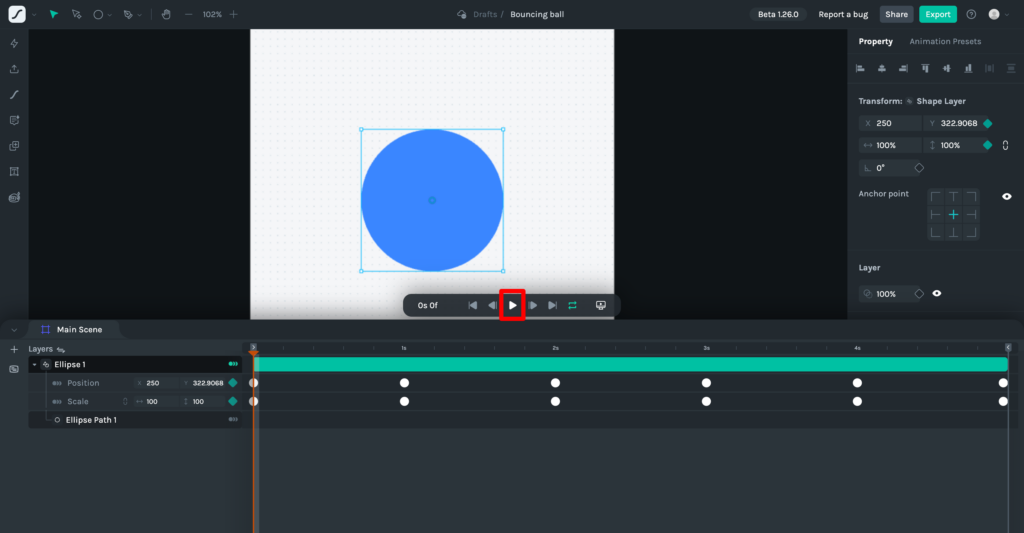
Preview the animation by clicking the “▶️” button or pressing the Space key.
If the timing or movement is not as desired, adjust the position of the keyframes or the interpolation method.
6. Exporting the Animation
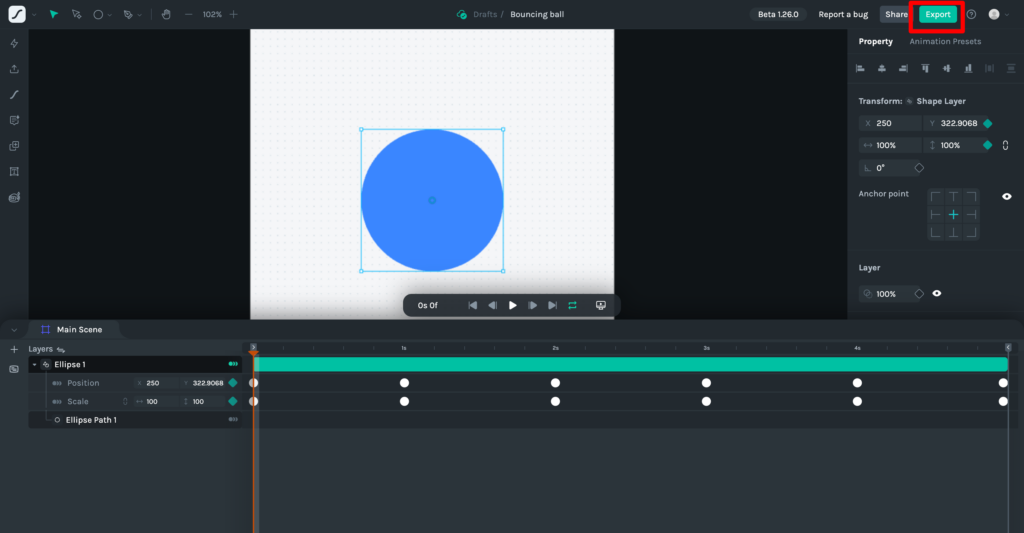
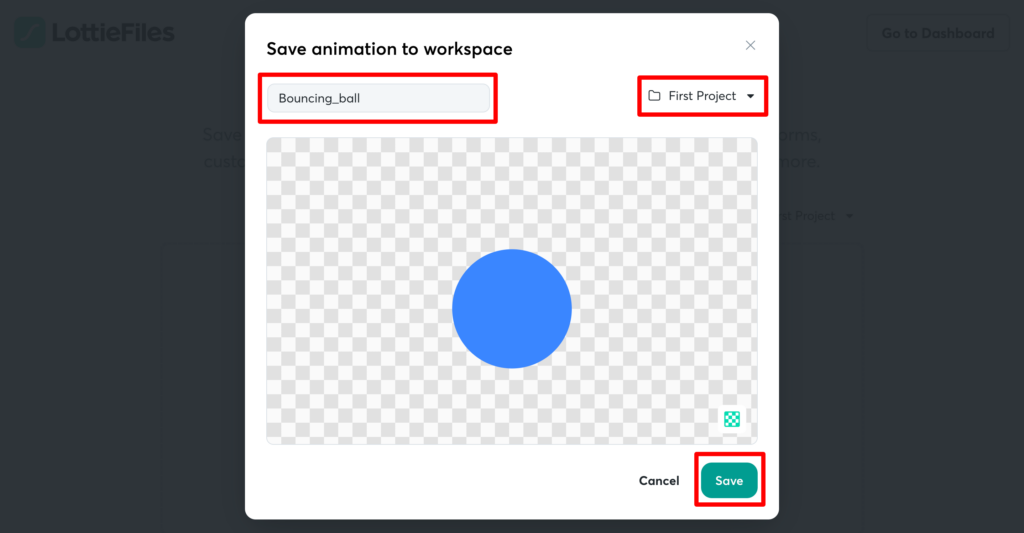
Click the “Export” button at the top right of the screen to open the save screen. Select the file destination from the dropdown at the top right of the screen, change the animation name as desired, and save.
Using Adobe After Effects
After Effects is suitable for creating more complex and sophisticated animations.
1. Creating the Animation
Create the animation in After Effects as usual. Make sure to use only the features supported by Lottie. The following features are not supported:
- Gradients (Fill and Stroke)
- Masked Path Display
- Complex Effects (All standard After Effects effects)
- Image Usage
- 3D Expressions
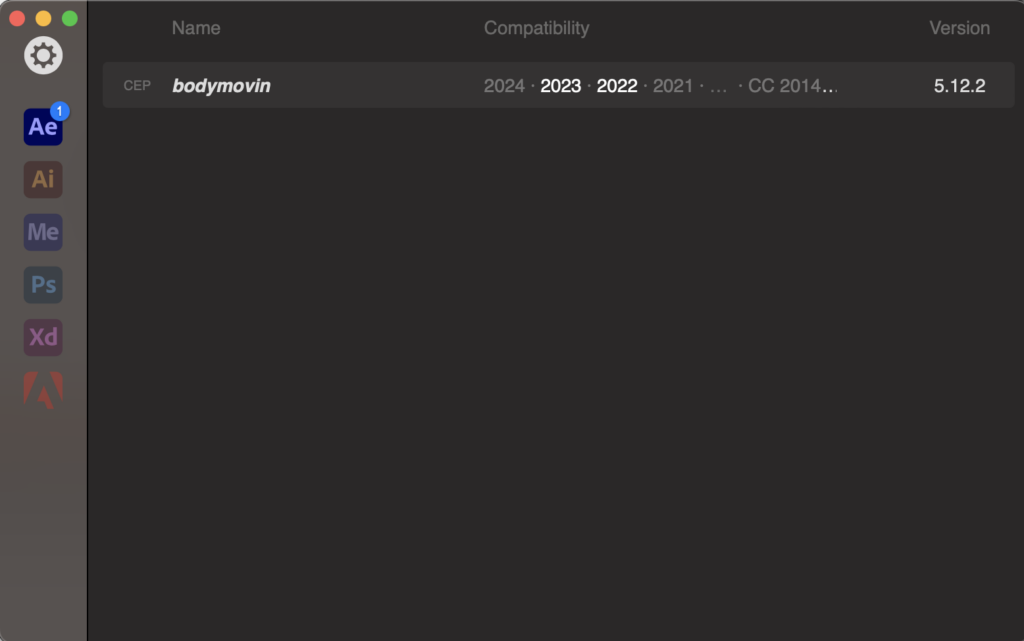
2. Installing the Bodymovin Plugin
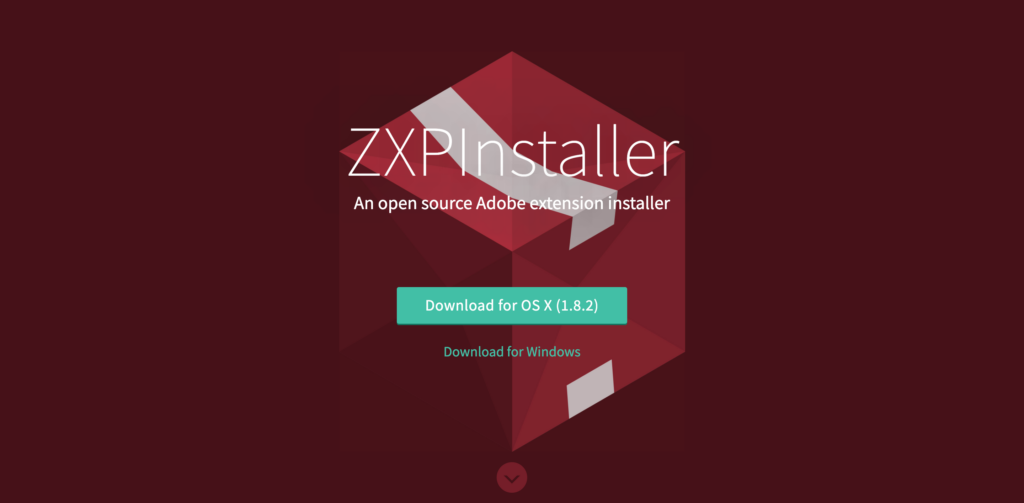
Download and install ZXPInstaller from the official ZXPInstaller website. ZXPInstaller is a tool that easily installs Adobe’s ZXP format extensions.
Download the ZIP file from the Bodymovin GitHub page and ensure that the Bodymovin plugin (ZXP file) “bodymovin.zxp” is located in the /build/extension directory.
Launch ZXPInstaller and drag and drop the “bodymovin.zxp” file you confirmed earlier to install it.
3. Exporting to Lottie File
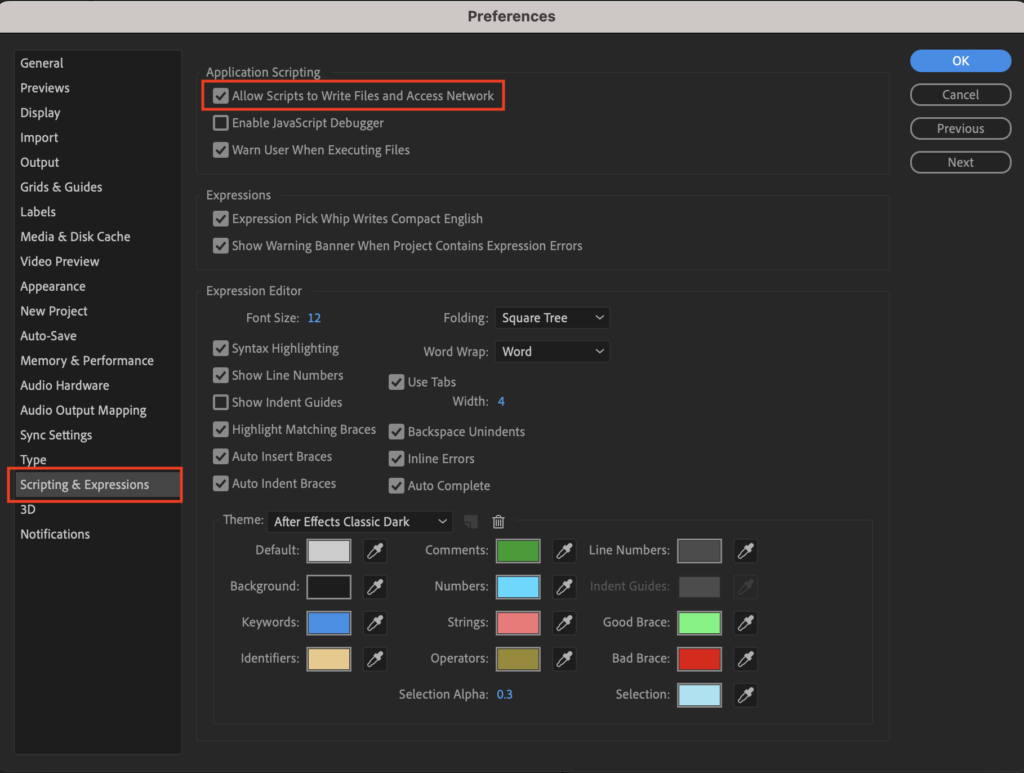
From the main menu, select After Effects > Preferences > Scripting & Expressions to open the window. Check the “Allow Scripts to Write Files and Access Network” option.
Enabling this setting allows the Bodymovin plugin to function correctly and export Lottie animations as JSON files.
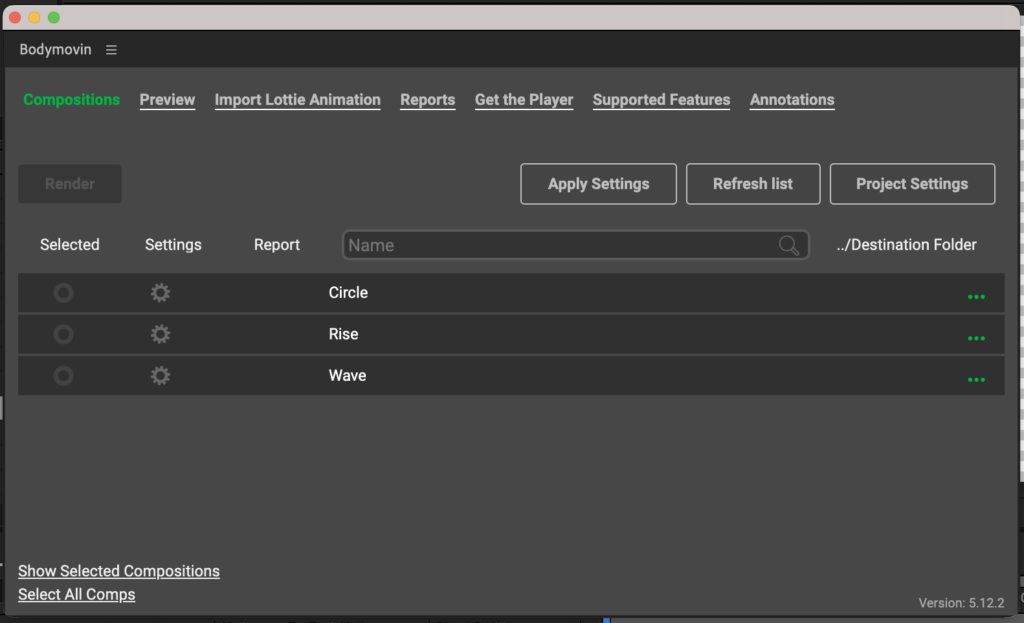
From the main menu, select Window > Extensions > Bodymovin to open the window.
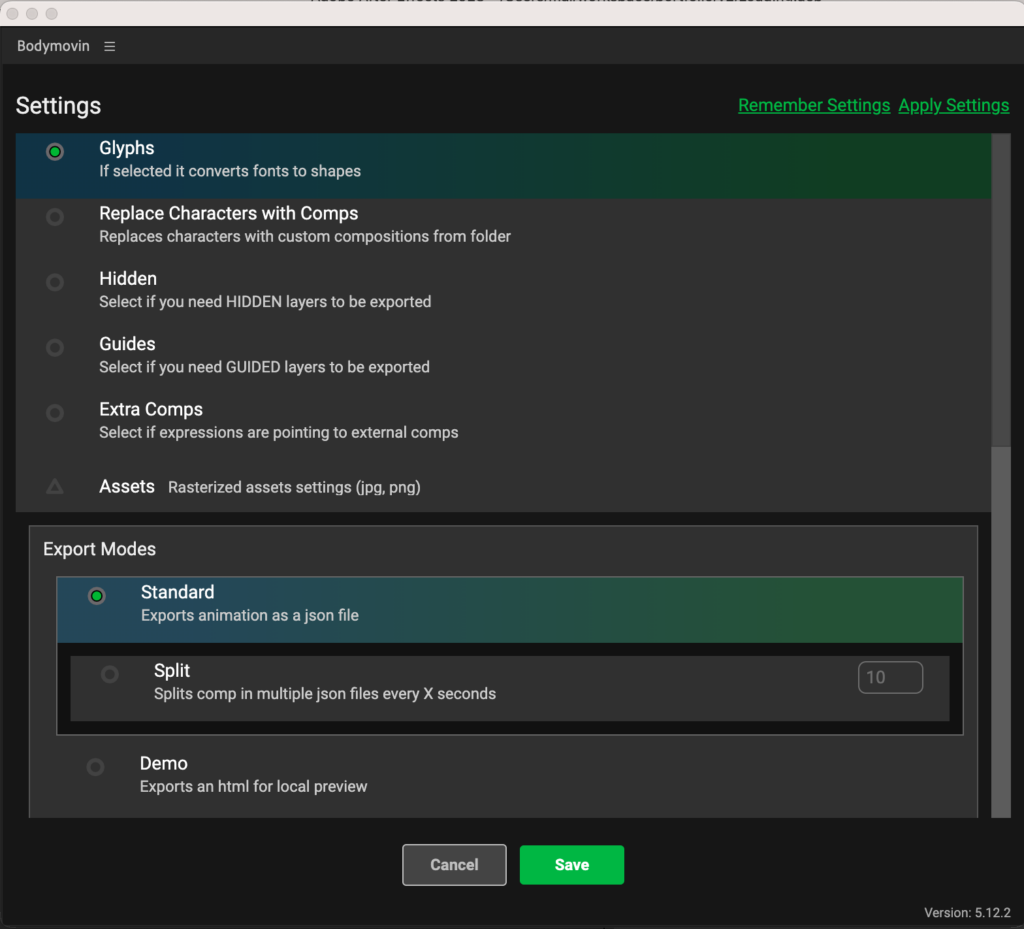
Select the necessary options in “Settings“. For details on each setting, refer to the official Bodymovin documentation.
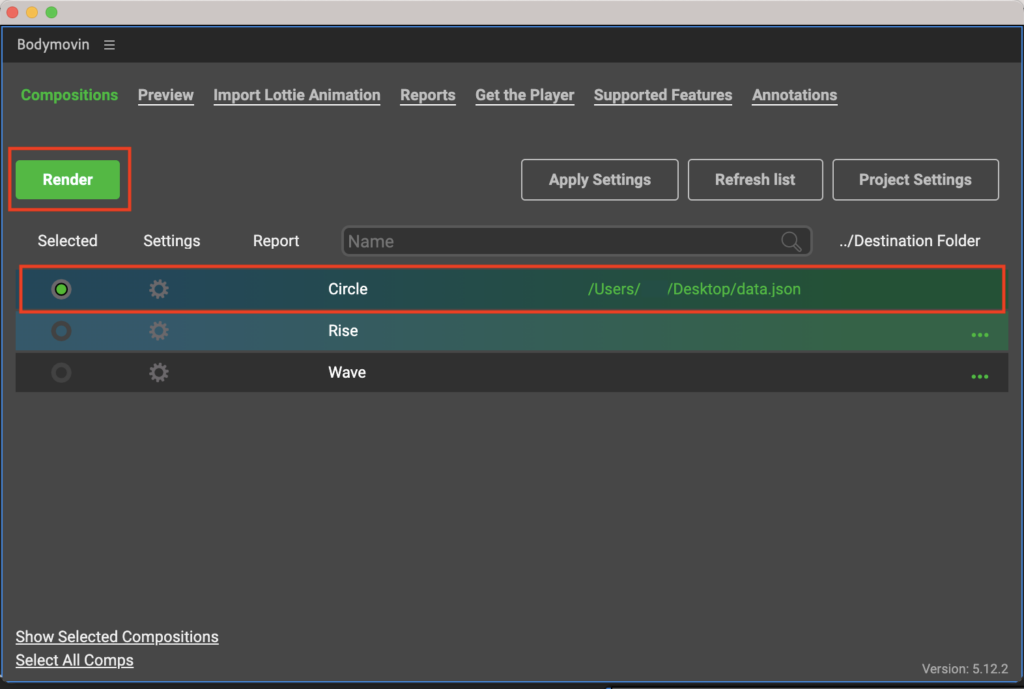
Select the composition you want to export under “Selected“, set the destination folder from “Destination Folder“, and click the “Render” button to save the JSON file.
4. Verifying the Animation
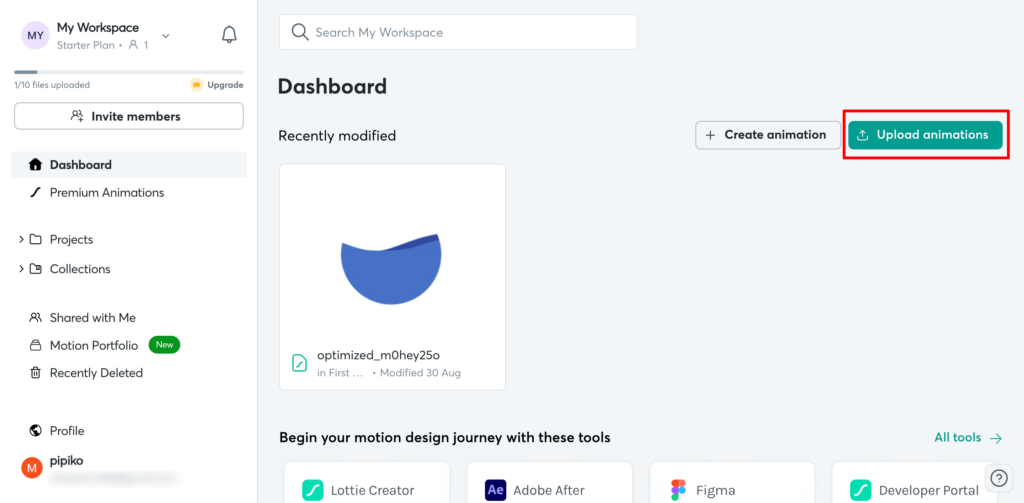
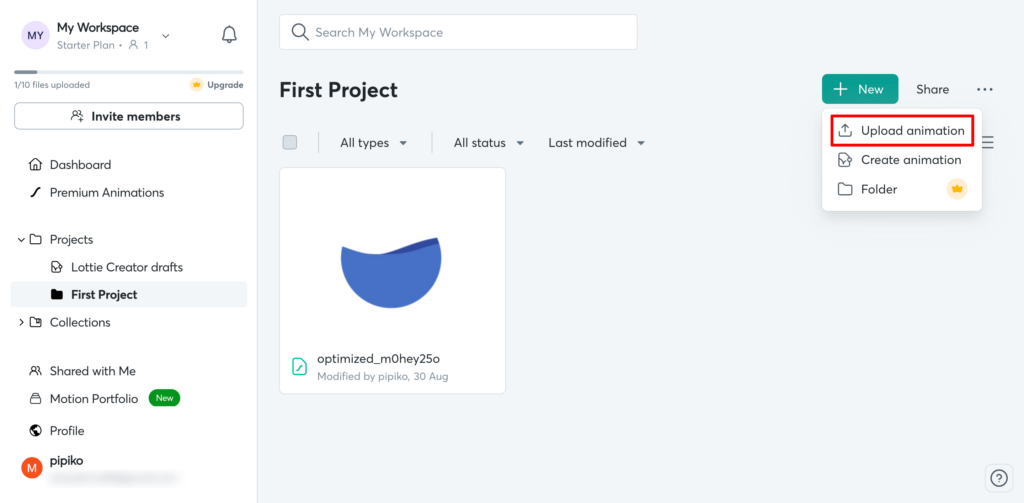
Access LottieFiles and click the “Upload on animation” button in the Dashboard or the “+New” button in the project file to upload the animation.
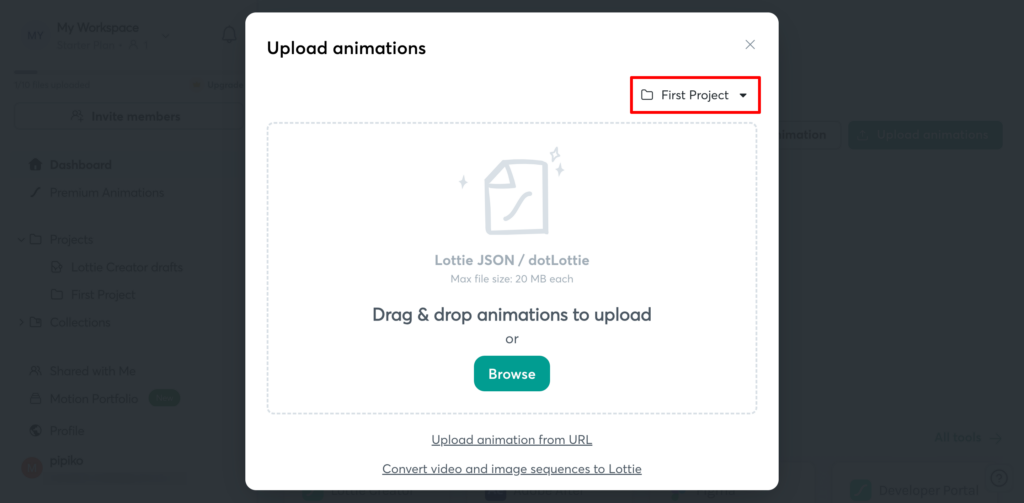
An upload screen will appear as shown below. Select the file destination and drag and drop the exported Lottie file.
Once the upload is complete, the created animation will be displayed below. If the animation is as expected, it is OK. If necessary, return to After Effects to adjust the animation, export it again, and upload it.
Websites to Get Free Lottie Animations
If you can’t create animations yourself, you can still get pre-made Lottie files. Here are some websites where you can find free Lottie animations. Explore and find the animations that suit your needs.
LottieFiles is the largest library of Lottie animations. It offers comprehensive tools for creating, editing, testing, and exporting Lottie animations. You can customize animations to your liking by changing colors, playback speed, and more.
IconScout is a well-known site that provides high-quality icons and illustrations. It offers access to over 429,000 Lottie animations, both free and paid. Like LottieFiles, you can customize these animations to fit your preferences.
Creattie is a design library featuring works from award-winning animators and illustrators. You can filter animations by style and category to quickly find what you need. Becoming a paid member gives you access to more animations and customization options.
Let’s Implement Lottie
Here, we will introduce examples of implementation using the Lottie Web Player, the lottie-web library (for HTML), and React.js.
Implementation Using Lottie Web Player
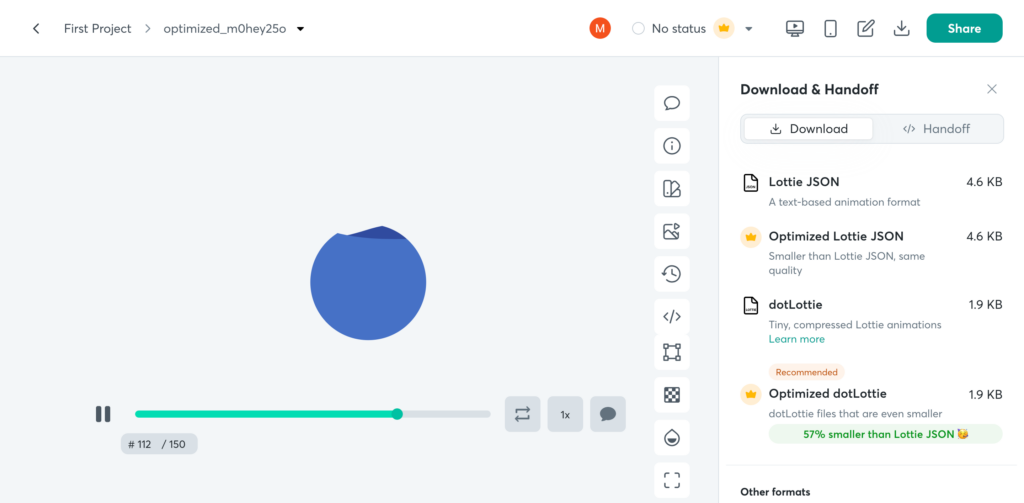
Select the animation you want to implement from the animations uploaded to LottieFiles and open the detail screen.
Open the sidebar with the “</> Handoff & embed” icon and turn on “Enable Asset Link” in the “</> Handoff” tab.
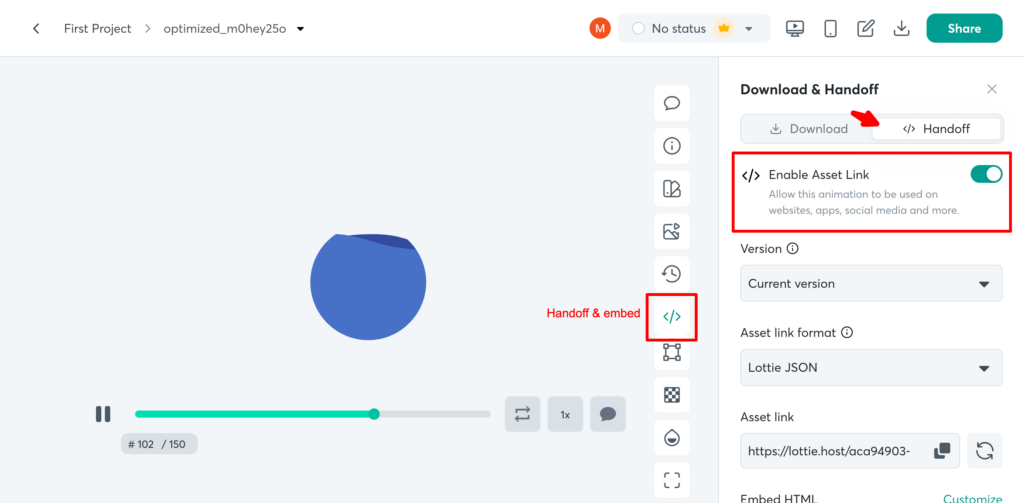
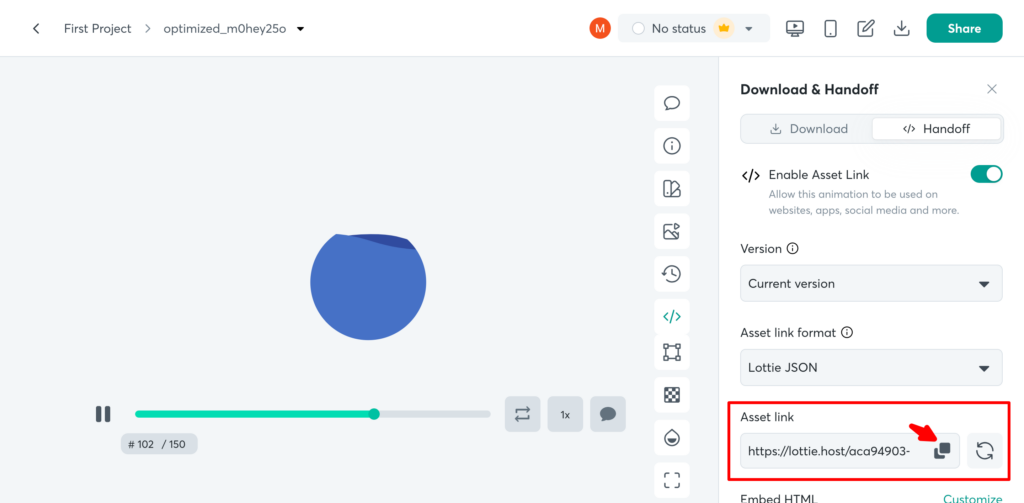
Copy the Asset Link and open the web player page(https://lottiefiles.com/web-player).
Paste the copied Asset Link into the “Your dotLottie/Lottie JSON URL:” field in Generate Code.
The animation will be displayed on the right side of the screen, where you can set the size, animation speed, etc.
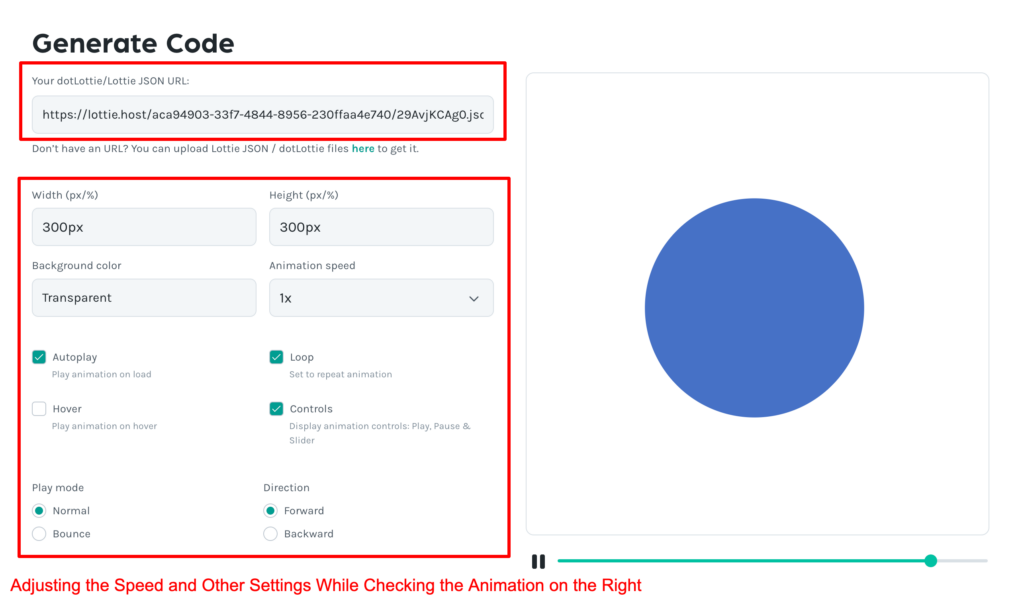
Once the settings are complete, copy the code displayed in Generated Code. When copying, choose either dotLottie or Lottie JSON.
Comparison Between dotLottie and Lottie JSON (Excerpt from the Official Page)
dotLottie uses an alternate compression method, allowing for considerably smaller animation files compared to JSON. This is especially effective as an alternative to inlining image assets as Data URIs. Additionally, dotLottie can package multiple animations into a single file, further reducing the operational costs of distribution and bandwidth utilization.

Paste the script tag into the head tag and the lottie-player tag into the body tag where you want to display the animation.
Implementation Using lottie-web Library
Load the downloaded lottie.js, lottie.min.js, or CDN in the head tag (the sample code uses the CDN implementation method).
CDN reference: https://cdnjs.com/libraries/lottie-web
lottie-web: https://github.com/airbnb/lottie-web
<script src="https://cdnjs.cloudflare.com/ajax/libs/lottie-web/5.12.2/lottie.min.js"></script>Set a tag with a specified id name in the body to display the Lottie animation. Adjust the size and position of the animation as desired.
<div id="lottie-container"></div>Set the parameters according to the library specifications in JavaScript to display the animation.
lottie.loadAnimation({
  container: document.getElementById('lottie-container'), //ID name set for displaying Lottie animation
  renderer: 'svg',
  loop: true,
  autoplay: true,
  path: 'src/asset/lottieAnimation/pageOpenLoading.json' //path to the animation JSON
});
Implementation Using React.js
Install the @lottiefiles/react-lottie-player library officially provided by LottieFiles.
npm install @lottiefiles/react-lottie-playerSpecify the Lottie file (in this case, the file name is set to wave) in the src of the Player component to display the animation.
This time, we set a loading animation that is displayed first when the page loads (the style uses TailwindCSS).
Other features such as pause and error events are also provided, and additional features such as changing the animation speed and background color are available. For more details, please check the library’s GitHub repository, which is linked above.
import { useRef, useCallback } from 'react';
import { Player } from '@lottiefiles/react-lottie-player';
import wave from '../src/asset/lottieAnimation/pageOpenLoading.json'; //path to the animation JSON

export default function App() {
  const playerRef = useRef(null);

  const playAnimation = useCallback((event) => {
    if (event === 'load') playerRef.current?.play();
  }, []);

  return (
    <div className="bg-slate-950 min-h-screen flex items-center justify-center">
      <Player
        ref={playerRef}
        onEvent={playAnimation}
        autoplay={false}
        loop={false}
        controls={true}
        src={wave} //animation file
        style={{ height: '300px', width: '300px' }}
      />
    </div>
  );
}
Conclusion
Lottie animations are a powerful tool for easily adding high-quality animations to websites and apps. By utilizing Lottie animations, you can enhance the user experience and increase the appeal of your website or app. I highly recommend you try it!
